Viva Support: Notecard Appliers
If you're a creator - or if you just want to make some of your own textures for your avatar - you'll need to use an applier. Viva accepts textures from two different types of appliers. One is the Multi Purpose Applier in which you drag textures into a HUD. The other type is a "notecard applier." This webpage is about the notecard type applier. With a notecard applier, you need to know the UUID's of your textures. What's an UUID? It's an acronym for "Universally Unique Identifier." Every texture, and other "assets" in Second Life, is identified by an UUID. An UUID looks something like this: "77812g3h-k095-l9c8-058m-h9572e6ef1b4." As long as you have full permissions, you can easily get the UUID of a texture by right clicking on it and selecting "Copy Asset UUID." The Notecard Process in a Nutshell . . . A very quick rundown of the process goes like this: you start by entering the UUID of your texture on a notecard. A prim is then rezzed, and into the prim you drag a script provided by the developer of the mesh avatar. Into the prim, the notecard goes. The script reads the UUID from the notecard and deletes it. Once that happens, it's ready for the customer. The customer clicks on the prim and the script sends the texture to the mesh body. The Process in Detail Let's run through each of the steps, looking at the process in more detail. To do that, I'll use a specific clothing example: a dance leotard. I'll use the leotard because it has both an upper and lower. (This is the same leotard that I used for the tutorial on using the Layers component of the Master HUD.)
2. Look the following subfolder in the Viva folder: "Applier Scripts & Notecards." In the folder, you find 4 different scripts. The script are for Skins, Finger & Toenails, Chest Area and Layers. We are dealing with Layers, so we'll drag the script ("Script: Texture Loader / Applier for LAYERS) into the prim.
3 Each of the scripts has a notecard (called a "Texture Loader") to go with them. We want the "Texture Loader for LAYERS." First, make a copy of the notecard and then open the copy of the notecard (shown below).
4. Before filling in the information, let's see what we have:
5. Paste each of the UUIDs (and the Shininess/Glossiness value) in the appropriate places in the notecard. Note that you don't have to fill in all the spaces on the notecard, just UUID's that you have.
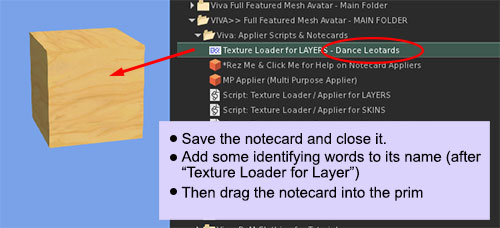
5. Add some descriptive words after "Texture Loader for Layers." (We don't want to remove the phase "Texture Loader for Layers." That's how the script makes sure that you are loading the correct notecard.) In this example, we've added: "Dance Leotards." 6. Drag the notecard into the prim.
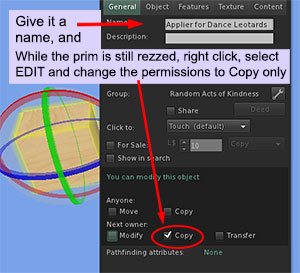
9. While the prim is still rezzed, right click on it and select EDIT. Then click on the "General" tab. Give it a name and change the permissions to Copy Only. Make sure that you change the permission while the prim is rezzed. It is ineffective to change permissions in the Inventory
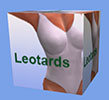
7. Add a promotional image to the prim. 8. Test the applier by clicking on it. It should send the texture to the body. 9. Take the prim into your inventory. It's ready!
Linking Several Texture Loaders Together It is possible to combine several notecard appliers together in a HUD. To do this, run through the process, above, creating the one-prim appliers for each product. Each of the applier prims, then, will serve as the buttons on the HUD. Set the applier prims aside for a moment. Rez one additional prim. This will form the base for the buttons. In a graphics program, create a texture, appropriate for the products, and load it on the base prim. Arrange each of the applier prims on the base prim. The applier prims need to go on face #4 of the base prim. That's the side that shows up when attached as a prim. You can check face number by going into EDIT. Turning on "Edit Link" AND "Select Face." Click on a face. Then use the keyboard short: Ctrl+Alt+Shift+T. A message will appear with the texture size and the face number. (I always forget that keyboard short cut, and I wanted to include it in case it's not on the tip of your tongue either.) Link all the prims together. Make sure the base prim is the last to be linked. The last linked prim is becomes the Root Prim - and that's what we want for the base. Just about ready, but don't leave out this step. In the "Applier Scripts & Notecards" folder, you'll find the "Coupler Script." The Coupler Script is required any time you have two or more applier prims linked together. It needs to go into the Root Prim. Give it test. Make sure all of the buttons work, and if so, you're ready to roll with it.
Links to Help Support | Viva Forum | Creator's Information | Comparison Chart of the 3 Levels |
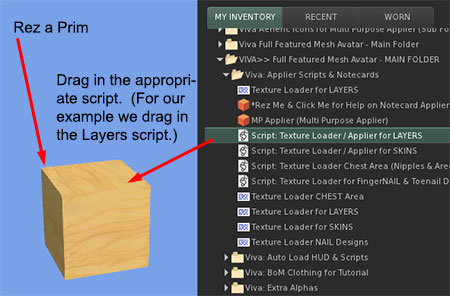 1. Rez a prim. A cube is just fine.
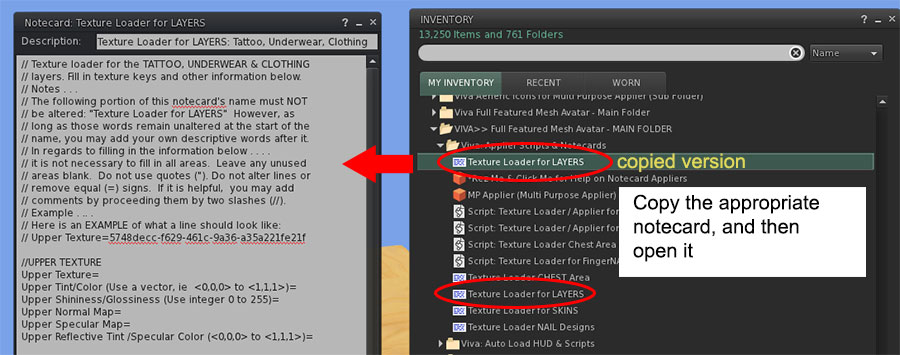
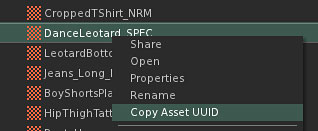 The leotards also have a specular texture map for both the upper and lower. Specular maps are used to create shininess. (The leotard is made of a nylon-like material and is shiny - and the thus the need for a specular map.) Once again we can use "Copy Asset UUID" to get the UUIDs for the notecard (as illustrated on the image to the right. )
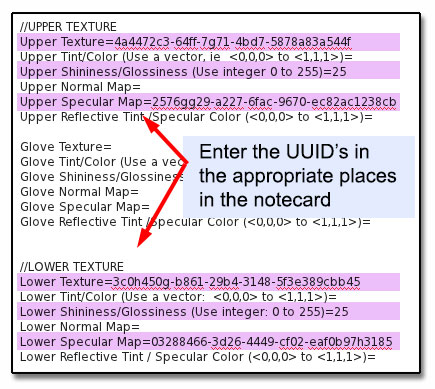
 4. When finished filling in the notecard, save it and close.