Free Version: Quick Start Guide
If you obtained Viva from an inworld store, you'll need to unpack it. The unpacking process involves organizing the contents in several subfolders. This will guide you through the process: Unpacking Viva If you obtained Viva from the Marketplace, it has been pre-organized in folders and you can go directly to the Quick Start Guide below . . . In order to get rolling quickly, I've included a default skin and shape in Viva folder. The shape has been created specially for Viva, and the skin matches the skin which has been pre-applied to the mesh body. You can change, of course, to different skins and shapes. (Ten free skins come with the package.) But starting this way will help coordinate all the various body parts and features. After this quick introduction, you can branch out and tweak things to your needs. Look for the "Default Skin Wearable" in the Viva Main Folder (VIVA>> Mesh Avatar - MAIN FOLDER). Right click and select "Wear." This will coordinate the skin of your system head with the pre-applied skin on the mesh body.
Find "Alpha: Primary" in Viva's Main Folder. Right click and "Wear." Your body will disappear and for the moment, at least, your head will be floating in space.
Look for "Default Body Shape" in the Main Folder. Right click and "Wear."
Right click and Wear "Default Physics" in the Main Folder. (I won't take time to discuss physics now, but if interested, you'll find a discussion about it here: Viva's Physics Effects.)
Find "Viva Body - FREE Version - Completely Assembled" in the Main Folder. Right click and "Wear."
. It's up to you, but at this point, it might be helpful to have your avatar on a pose stand. You'll find a pose stand in Viva's Main Folder. Right click & select "Stand." Now, take a look at your avatar (shown to the right). The Alpha Primary that you wore in the above step made your system body invisible from the head down. (The "system" body is the basic body with which you start in Second Life.) Then, when you attached the Viva Body (by selecting "Wear"), it took the place of the system body. At first, it may seem like nothing changed, but if you look closely, the feet have toes. (Oh yes toes! The system body doesn't have them). And you'll see nicely formed fingers and smoother lines throughout the mesh body. The Alpha Primary didn't hide the system head, so it's still showing. That's an advantage because the system head is well supported in Second Life with a variety of animations and makeup products - free and otherwise. When you "wore" the default skin in the first step above, it appeared on your body and the system head. The skin on the mesh body has been pre-applied, and it is the same as the default skin on your system head. That's why when you look at your avatar, the skin on the system head and the skin on mesh body match. This has been fun, but let's get some clothes on . . .
Attaching a Mesh Dress (Black Party Dress)
A quick note about "Wear." I've pre-attached all of the items that you find in the Viva folder to different attachment points (here's a list). That way, you can just select "Wear" and you're ready to go. When you are attaching items that aren't from Viva's folders, you'll want to select "Attach" and select an attachment point. A clothing item that hasn't been pre-attached, will always attach to the Right Hand when "Wear is selected. If you select "Wear" for the next non pre-attached item, it too will attach to the Right Hand, removing the previous one. You'll see the dress appear on your avatar. Viva's body shape is controlled by the "Appearance Sliders." (The Appearance Sliders are reached by right clicking on your avatar and selecting "Edit Shape.") That allows you to change height, breast size, body plumpness, etc. As you change the shape of the body, the dress changes along with it. While the Appearance Sliders give you a considerable amount of flexibility, there is a limit to how much the dress can change. With some of the most extreme positions, you may find that parts of the body sticks through the dress. That's where the Alpha HUD comes in handy and we'll look it next . . .
Alpha HUD
Once you have the HUD showing, you'll see a mannequin of the avatar. By clicking on the colored areas of the mannequin, you'll see them turn black. At the same time, you'll see that part of your mesh body disappear. Thus, you can use the Alpha HUD to clear up clothing problems if portions of the body stick through (as shown to the far right). If you want the body part to reappear, turn it back on by clicking the same area again. The black is removed and the body part becomes visible again. There's more information on Alpha component here: Level 1 Alpha HUD
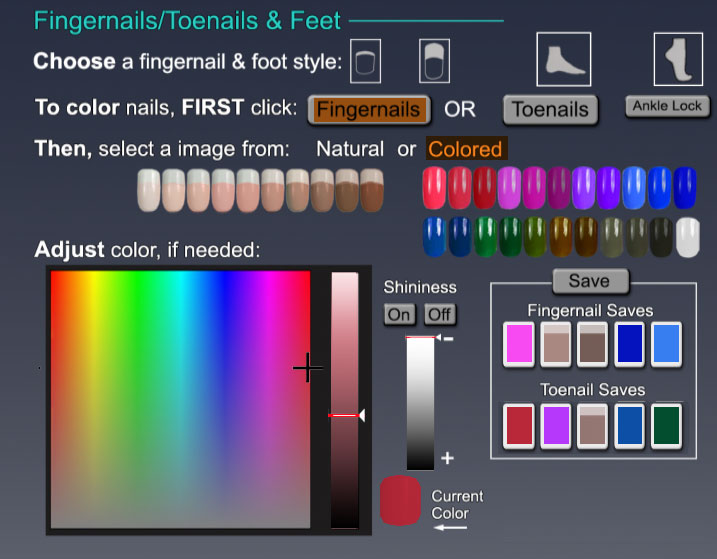
Nails - Coloring The Fingernail HUD gives you the ability to color your avatar's nails - both fingernail and toenails (can't forget those toes!) It's found in your Main Folder. Right click, and select "Attach HUD to . . . " and select an area of your screen where you would like to attach. I usually attach it to the same place that I attach the Alpha HUD. Once you select a HUD location, the next time you use it, you can simply right click and select "Wear." By attaching the HUD's to the same place, I can "Wear" the first one, and then if I need the second HUD, I can "Wear" it, and it will replace the first. That keeps me from having too many HUD's on the Second Life browser screen.
Much of the Fingernail HUD is self explanatory. You can change the foot style as well as the style of fingernail by clicking the respective box. You have your choice between natural or colored nails. Nails are colored by clicking on the color palette - and polish (shininess) is easily added. You can really make your nails look beautiful. Remember to highlight either "Fingernails" or " Toenails" before coloring. Sometimes, you'll find yourself clicking colors and nothing seems to be happening. That's probably because you might have "Toenails" selected but you are looking at your fingernails. It's probably easiest for you to play around with it. For anything specific, here's a helpful link: Level 1 Fingernail HUD Help
Hand Poses Hand poses are fairly self explanatory. Use the Hand Pose HUD when you want to try something new with your hands. For more information on the Hand Pose HUD and some background on the poses, see: Hand Pose HUD Help.
Modular System
(If you'd like a bit more information about the modular system, the contextual help documentation prepared for Level 2 and Level 3 might be helpful.) Since we are talking about Level 1, the question naturally arises: why even include the modular system with Level 1? Good question. Let me take a stab at it. Firstly, it's a convenient way to deal with changes or improvements in body parts. For example, in the future I may make a different set of hands available or I may upgrade the script found in the feet. With the modular system, all that is necessary is to replace that part rather the entire body. Secondly, the modular system provides you with a Neck Fix option. The Neck Fix helps blend the joint between the system head and the neck of the mesh body. With the modular system, you can decide whether you want to use a Neck Fix or not. And if you do decide to use it, you have the option to select one of the pre-made Neck Fixes that come with the included skins. Since we are on the topic, let's explore the Neck Fix . . .
Neck Fix As mentioned above, the Neck Fix helps blend the joint between the head and neck. If you've been following along, you will be currently wearing the "Assembled" body. The Neck Fix, however, is not included with it. So let's You'll find the Neck Fix in the Modular System subfolder. Right click on and select "Wear." (You can select "Wear" since I've pre-attached it, and as long as you haven't been changing attachment points, it won't interfere with any existing attachments.)
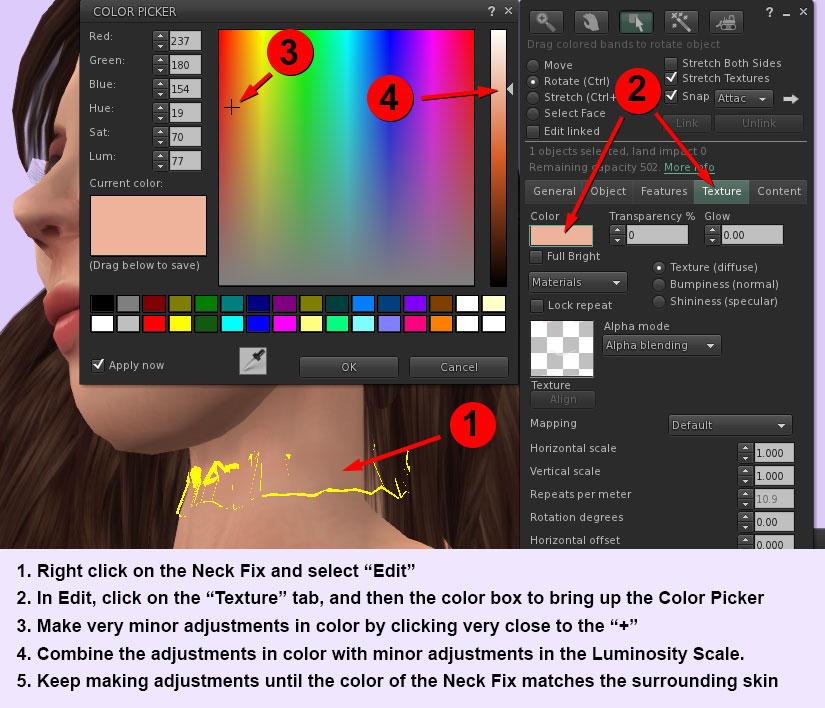
I have pre-set the color of the neck fix to match the default skin. If you use one of the ten included skins, I have prepared neck fixes for each one with the proper color. You'll find those in the "Free Skins" subfolder. But what if you are wearing skins that don't come with Viva? If you are not using one of the included skins, you'll need to manually change the color. Here's how to do it. With the Neck Fix attached to your body, right click on it and select "Edit." Click on the "Texture" tab and then the color square (see illustration below). You can change the color by clicking on the color palette, but as you click make very small changes from where the Plus Marker (+) is located. I find it best to click along the Plus Marker lines, either a bit up or down, or to either side. You'll also need to click on the Luminosity scale. Again, make your clicks very close to the line. It just takes small adjustments to get the right color. Keep at it until the color of the Neck Fix matches that of the surrounding skin.
Saving Outfits One quick word about mesh avatars and outfits. Second Life has the ability to save an outfit. An outfit consists of everything that you are wearing including clothing, the mesh body, and any attachments. You save an outfit by right clicking on your avatar and selecting either "Appearance" or "Edit Outfit." The items which make up a saved outfit are not actual copies, but rather they are links to items scattered about in your inventory. Included in those links is a link to the Viva mesh body. But if the link went to the body in Viva's Main Folder, you would always end up with a different set of body characteristics. If you are saving an outfit, you should make a copy of it. The copy can be placed along with a clothing item or a can be placed in a shared folder that you might use for similar outfits. . That's it. If you need additional details, check out any of the links below.
Links to Help Support | Viva Forum | Creator's Information | Comparison Chart of the 3 Levels
|


 You'll find the Black Party Dress in the Main Folder. Right click on it and select "Wear."
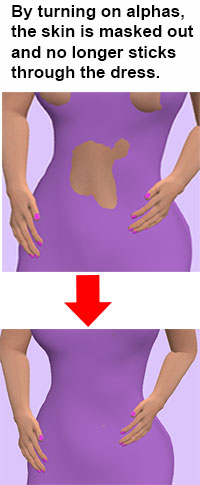 The Alpha HUD is found in the Main Folder. Right click, and select "Attach HUD to . . . " and select an area of your screen where you would like to attach. I attach it on the left side of the screen just below the chat window. Since Viva HUD's sends all of their messages to the chat window, it's nice to have the two together. This works for me, but you may come up with your own system.
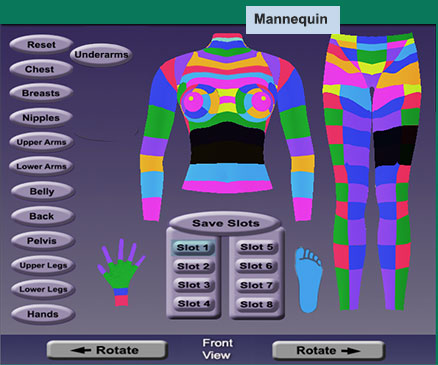
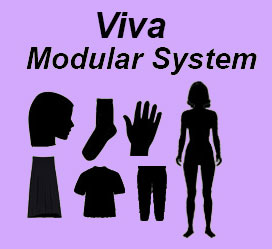 The modular system allows you to assemble the mesh avatar from its individual parts. The parts consist of the following: upper and lower body, feet, hands, and Neck Fix. A major reason why I included a modular system with Viva was to help cut back on the amount of virtual world resources used by a mesh avatar (which, in turn, cuts back on lag). The Free version of Viva is already slimmed down to just the essentials, but Level 2 and 3 users can effectively use the modular system to save resources.
 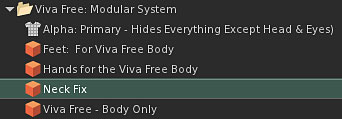 get it attached and see what it looks like.
 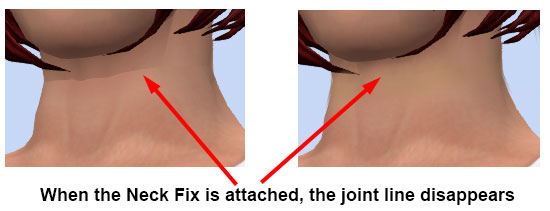 As you wear it, watch and you should see the head and neck blend nicely.